本文主要介绍将训练好的网络模型,移植到FPGA等硬件平台上所必须的准备工作。
不涉及具体的用C语言重新编写卷积操作、RAM存储等设计,本人做的只是辅助工作=-=。
项目简介
论文地址:FaceNet: A Unified Embedding for Face Recognition and Clustering
将在服务器上训练好的FaceNet模型移植到FPGA等硬件平台上,实现人脸的检测推断过程。要想实现上述操作,必须先进行下面2个操作:
- 模型参数的提取:解析 FaceNet 的网络结构, Restore 训练好的模型,提取各网络层参数。
- 参数的量化压缩:模型参数量巨大(浮点),为了节省空间及方便计算,将参数量化为 8 位的
定点数。
参数的提取
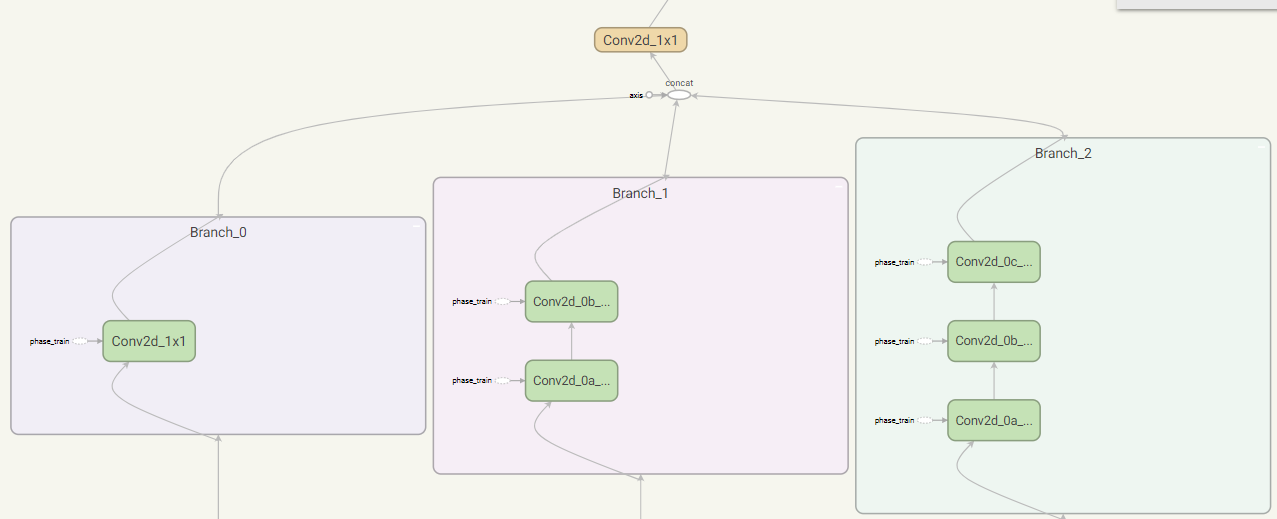
在提取参数前,我们先通过可视化工具Tensorboard解析了一下FaceNet的网络结构,它主要包含5个大模块:
block35
- Branch_0:32个$1 \times 1$卷积
- Branch_1:32个$1 \times 1$卷积、32个$3 \times 3$卷积
- Branch_2:32个$1 \times 1$卷积、32个$3 \times 3$卷积、32个$3 \times 3$卷积
- Mixed:将Branch_0、Branch_1和Branch_2连接起来
- Conv:32个$1 \times 1$卷积
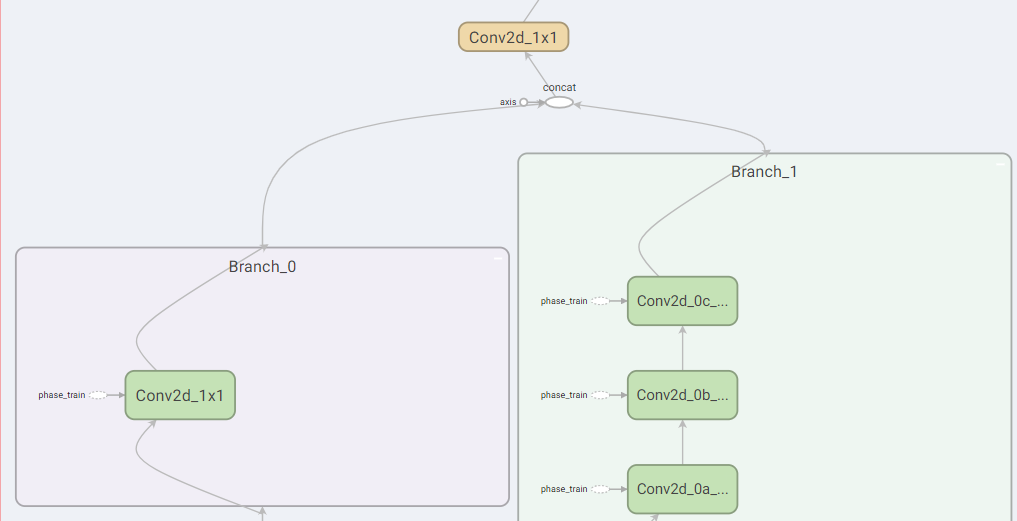
block17
- Branch_0:128个$1 \times 1$卷积
- Branch_1:128个$1 \times 1$卷积、128个$1 \times 7$卷积、128个$7 \times 1$卷积
- Mixed:将Branch_0和Branch_1连接起来
- Conv:128个$1 \times 1$卷积
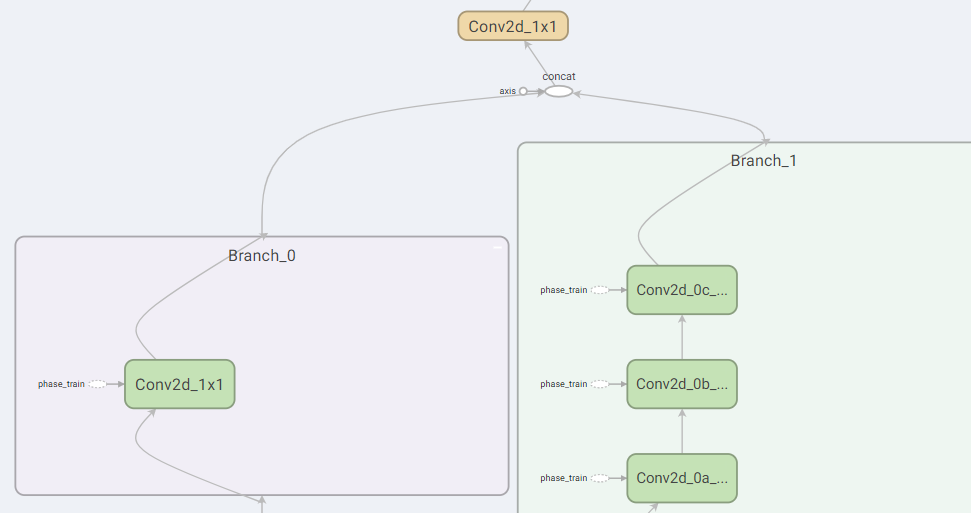
block8
- Branch_0:192个$1 \times 1$卷积
- Branch_1:192个$1 \times 1$卷积、192个$1 \times 3$卷积、192个$3 \times 1$卷积
- Mixed:将Branch_0和Branch_1连接起来
- Conv:192个$1 \times 1$卷积
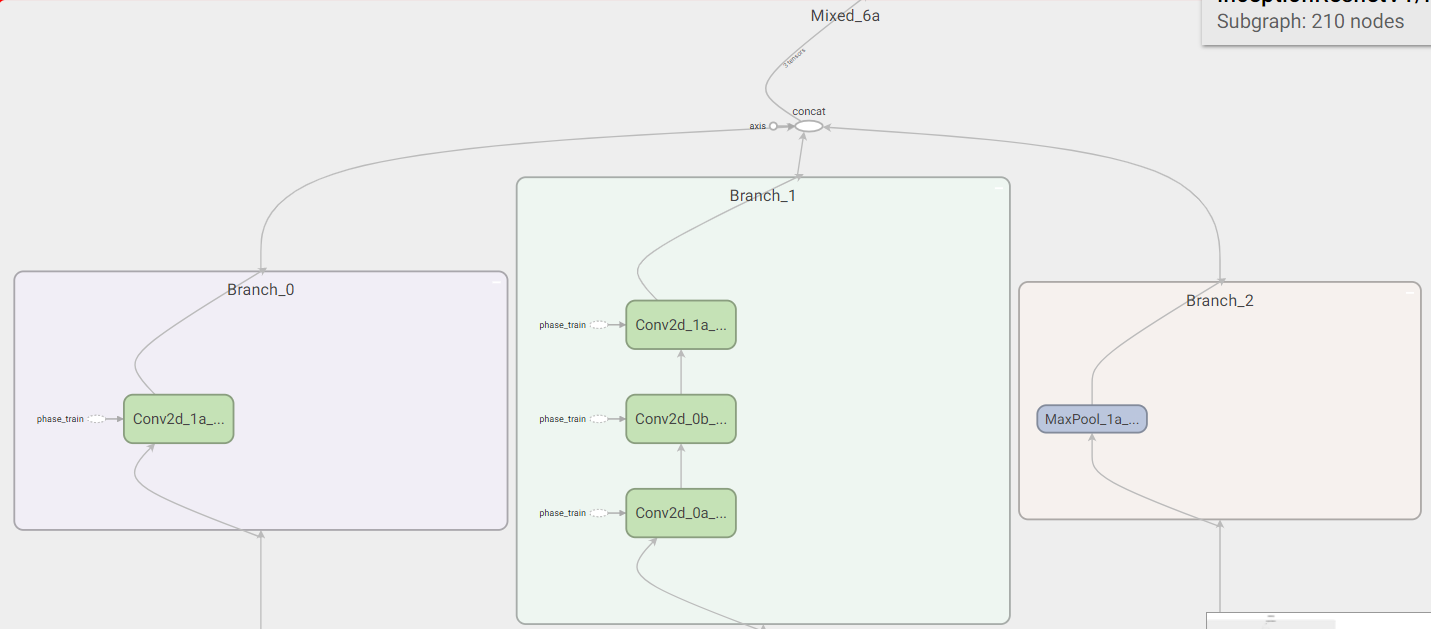
reduction_a
- Branch_0:192个$3 \times 3$(stride=2)卷积
- Branch_1:192个$1 \times 1$卷积、256个$3 \times 3$卷积、384个$3 \times 3$(stride=2)卷积
- Branch_2:$3 \times 3$,步长为2的最大池化
- Mixed:将Branch_0、Branch_1和Branch_2连接起来
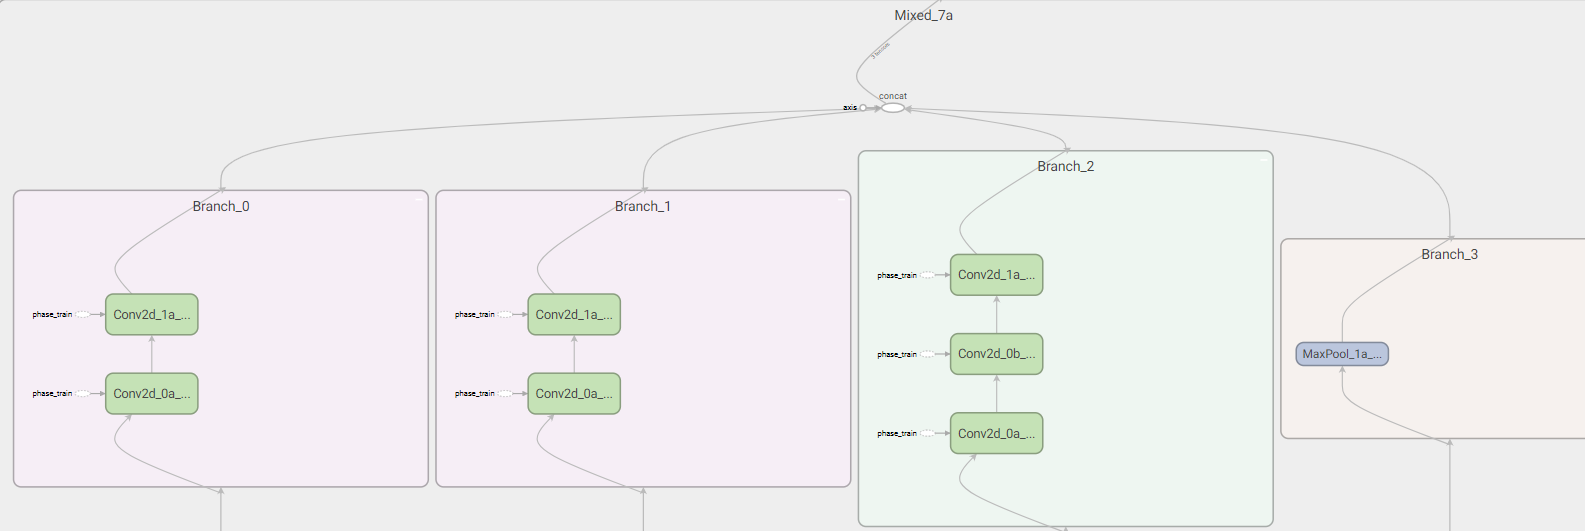
reduction_b
- Branch_0:256个$1 \times 1$卷积、384个$3 \times 3$(stride=2)卷积
- Branch_1:256个$1 \times 1$卷积、256个$3 \times 3$(stride=2)卷积
- Branch_2:256个$1 \times 1$卷积、256个$3 \times 3$卷积、256个$3 \times 3$(stride=2)卷积
- Branch_3:$3 \times 3$,步长为2的最大池化
- Mixed:将Branch_0、Branch_1、Branch_2和Branch_3连接起来
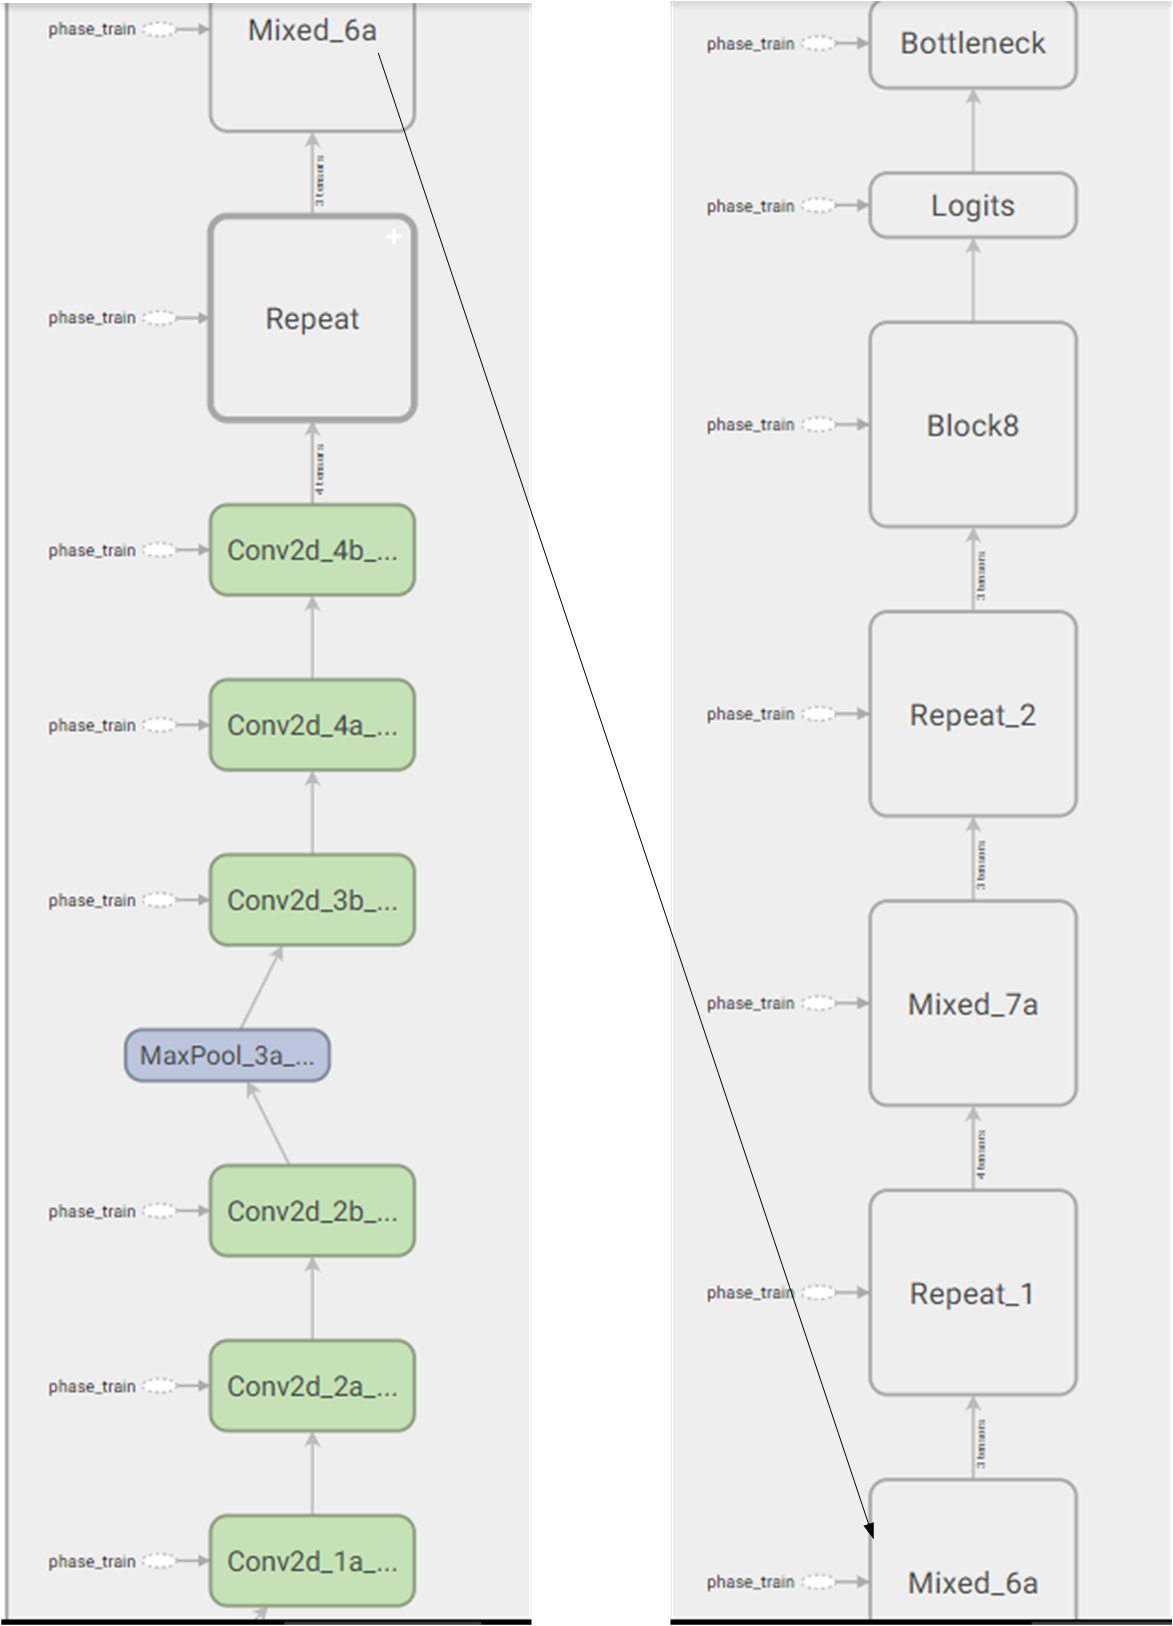
总的网络结构如下所示:
- Conv2d_1a:32个$3 \times 3$,stride=2的卷积
- Conv2d_2a:32个$3 \times 3$的卷积
- Conv2d_2b:64个$3 \times 3$的卷积
- MaxPool_3a:$3 \times 3$,stride=2的最大池化
- Conv2d_3b:80个$1 \times 1$的卷积
- Conv2d_4a:192个$3 \times 3$的卷积
- Conv2d_4b:256个$3 \times 3$,stride=2的卷积
- repeat:5个block35模块
- Mixed_6a:1个reduction_a模块
- repeat1:10个block17模块
- Mixed_7a:1个reduction_b模块
- repeat2:5个block8模块
- block8:1个block8模块
- Logits:平均池化、flatten、Dropout
代码实现
代码中会用到float_to_bin()这一个量化函数,下面会有所介绍
1 | import os |
参数的量化压缩
训练得到的模型参数都是浮点型的,为了节省在硬件上的存储空间并加速计算,我们将参数量化到了8位的定点数。主要包含2个函数:float_to_bin()和xiaoshu_bin()。
float_to_bin()
1
2
3
4
5
6
7
8
9
10
11
12
13
14
15
16
17
18
19
20
21
22
23
24
25
26
27
28
29
30
31
32
33
34
35
36
37
38
39
40
41
42
43import numpy as np
import xiaoshu_bin
import math
def float_to_bin(innum,n):
global innum_abs,res_nint_array
list = []
min = 2**(-n) #小数位取n位后,8位定点数能表示的最小值
max = 2**(7-n)-min #小数位取n位后,8位定点数能表示的最大值
innum_abs = abs(innum) #不管正负,都按正数处理
if (innum_abs<min): #如果表示的数小于最小,按最小处理
innum_abs = min
if (innum_abs>max): #如果表示的数大于最大,按最大处理
innum_abs =max
nint = math.floor(innum_abs) #取整,分割小数部分和整数部分
nf = innum_abs-nint #小数部分
res_nint = bin(int(nint)).replace('0b','') #整数部分直接调用bin函数处理
nint_num = len(res_nint) #整数部分的二进制表示占的位数长度
res_nint_array =np.zeros(nint_num) #创建矩阵
#print(nint_num)
res_nf = xiaoshu_bin.xiaoshu(nf,n) #小数部分调用xiaoshu_bin()函数
if (innum>=0): #原数为正数,二进制第一位为0
c =0
num_add =8-n-nint_num #除去小数位和整数位占的二进制位数后,还剩几位
num_add =np.zeros(num_add) #补0
for value in res_nint:
res_nint_array[c] =int(value) #整数部分二进制
c= c+1
#@final =[num_add,res_nint_array,n,res_nf]
else: #原数为负数,二进制第一位为1
d =0
num_add = 8-n-nint_num
num_add = np.zeros(num_add)
num_add[0] =1
for value in res_nint:
res_nint_array[d] =int(value)
d= d+1
#final = [num_add,res_nint_array,n,res_nf]
final_bin =np.hstack((num_add,res_nint_array,res_nf)) #最终表示
for bin_value in final_bin:
list.append(str(int(bin_value))) #字符串输出
final_bin_value =''.join(list)
return final_bin_value
#print(float_to_bin(-4.5,3))xiaoshu_bin()
1
2
3
4
5
6
7
8
9
10
11
12
13
14
15
16
17
18
19
20
21
22
23
24
25
26
27
28
import numpy as np
def xiaoshu(innum, n):
global N
N =n #小数部分占的位数
count =0
temp = innum
reco =np.zeros(N) #创建全0矩阵
if (innum>1) or (N==0): #不是小数
print('Error!')
return
while(N): #未超过小数部分的位数
count =count+1
if (count>N):
N = 0
return reco
temp =temp*2 #小数部分不断的乘2
if (temp>1):
reco[count-1] =1
temp = temp-1
elif (temp==1):
reco[count-1] =1
N =0
else:
reco[count-1] =0
return (reco)
#print(xiaoshu(0.0525,4))
量化结果展示
以InceptionResnetV1/Block8/Branch_0/Conv2d_1x1/BatchNorm_beta这一tensor为例:
量化前后对比: